

A painting snag list, also called a punch list, is a written record of every paint defect or unfinished item that needs correction before a job is signed off. Start right now: walk the space, photograph every visible defect, and note the room and exact location. That sweep, even a rough one, is your working painting punch list.
Key takeaways
A painting snag list closes jobs cleanly only when every entry is specific enough for a crew member to fix without asking questions, tied to a photo, and signed off in writing.
| Point | Details |
|---|---|
| Start with a sweep and photos | Walk the space, flag defects with numbered tape, and photograph each item the same day. |
| Use the full entry fields | Every item needs a location, defect description, correction instruction, owner, and target date. |
| Follow PCA P20 timing | Run the formal punch walk at substantial completion; expect corrections within a reasonable, agreed window. |
| Batch corrections into one visit | Confirm materials are ready, fix all open items in a single return trip, and re-inspect within 48 hours. |
| Capeapexpainters documents sign-off | The in-house team provides before-and-after photos and a signed handover record as standard practice. |
Table of Contents
- What a painting snag list is and when to prepare it
- Why a painting snag list protects the job and your bottom line
- Common painting defects to add to your snag list
- How to run a painting snag inspection step by step
- What to include in each snag list entry
- Who fixes snag items, realistic timelines, and PCA P20 guidance
- Managing remedial repairs and the re-inspection cycle
- Simple tools and templates that make paint snagging faster
- The punch list detail most painters get wrong
- Capeapexpainters handles the inspection and sign-off for you
- Sources
What a painting snag list is and when to prepare it
A painting snag list is narrower than a general construction punch list. It covers only the work the painting contractor agreed to do: surface prep, priming, and finish coats. Damage caused by other trades, owner changes, or warranty claims belong on separate lists, not here.
The scope test is simple: “Is this a paint defect from the agreed scope, or is it a change, damage, or warranty item?” If the answer is the latter, log it separately and handle it through a change order or warranty process.
Timing matters. The sequence that works in practice:
- The painting crew runs an internal walk before calling the job complete, fixes obvious defects, and documents corrections.
- The contractor or project manager then conducts a formal final punch walk at substantial completion, meaning the painting is done and surfaces are accessible.
- The client or inspector does a validation walk, marks remaining items, and signs off once corrections are confirmed.
The PCA P20 Recommended Protocol for Job Close Out formalizes this sequence: prepare an initial and a final punch list around substantial completion, keep items location-specific, and document completion in writing.
Why a painting snag list protects the job and your bottom line
A tight punch-list workflow does three things that matter financially.
First, it protects final payment. Without a closed list, a client can claim the job is unfinished indefinitely. A signed snag list with dated photos creates a clear endpoint: these items were outstanding, these were fixed, and this is the sign-off date.
Second, it separates scope from disputes. A blister that appeared three weeks after handover because of a moisture problem behind the wall is not the same as a blister caused by painting over wet substrate. Documenting the wall condition at handover, with photos, is what makes that distinction defensible.
Third, batching corrections into one focused re-visit cuts mobilization costs sharply. A painter who returns four times for one item each trip spends more time driving than painting. Proper Sherwin-Williams preparation guidance makes the same point from the other direction: thorough prep reduces the number of punch items that appear in the first place, which means fewer return visits.
Common painting defects to add to your snag list
Knowing what to look for is half the inspection. Group defects by symptom so you can move through a room systematically.
Coverage and appearance
- Holidays and thin areas: spots where the substrate shows through, visible in raking light. Flag as must-fix.
- Flashing: dull patches in an otherwise shiny finish, usually from touching up with a dry brush or mismatched sheen. Major defect.
- Sheen mismatch: one wall reads flat, the adjacent wall reads eggshell. Check under consistent lighting. Major defect.
- Colour mismatch: compare against the approved sample chip, not memory. Minor to major depending on visibility.
Application faults
- Runs, sags, and drips: paint that pooled and dried in a curtain. Visible at eye level on doors and trim. Must-fix.
- Lap marks: visible lines where a wet edge dried before the next pass overlapped it. Raking light reveals these on large flat walls. Major.
- Roller stipple and brush marks: texture inconsistency from wrong nap or incorrect technique. Minor on low-sheen walls; major on semi-gloss trim.
Prep and adhesion failures
- Peeling and blistering: paint lifting from the substrate, often from moisture or painting over a contaminated surface. Must-fix; investigate the cause before repainting.
- Patch ridges: filler or compound not feathered flat, visible as a halo under paint. Major.
- Adhesion loss: run a piece of tape firmly across the surface and pull it back. Paint that lifts with the tape has an adhesion failure. Must-fix.
Edges and overspray
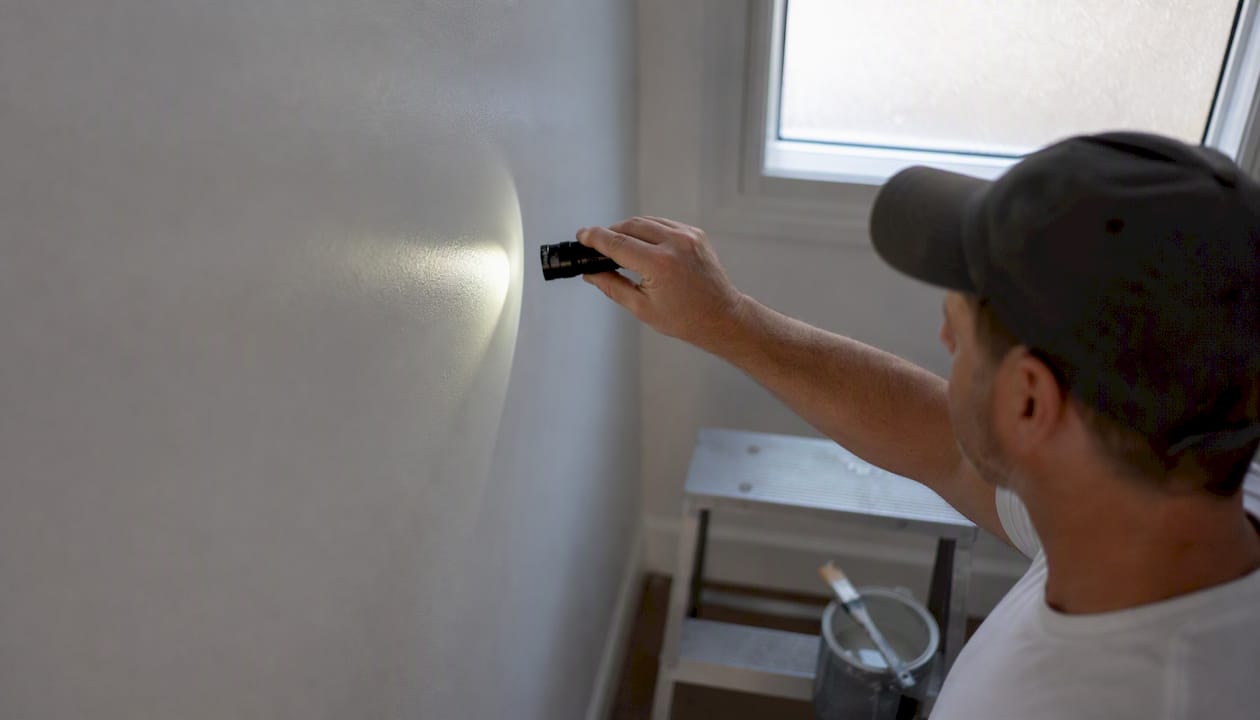
- Cut lines: ragged or wavy edges at ceiling, trim, or adjacent walls. Check with a flashlight held parallel to the surface. Minor to major.
- Paint on hardware: hinges, switch plates, outlet covers, or glass with paint spots. Minor but noted.
Missed surfaces
- Back edges of doors: often skipped. Check the hinge edge and the top rail. Minor.
- Behind radiators and pipes: use a flashlight. Minor unless specified in scope.
- Uninstalled plates and covers: note if they need painting before reinstallation.
A practical paint inspection checklist recommends using small numbered tape flags on each defect and photographing each one immediately. That way the photo log and the snag list stay in sync.
Pro Tip: For sheen and flashing defects, hold a flashlight at a low angle parallel to the wall surface in a darkened room. Problems invisible under overhead lighting become obvious under raking light.
How to run a painting snag inspection step by step
A repeatable process produces entries that painters can act on without asking follow-up questions.
Before the walk
- Pull the original scope of work or specification. Know what was agreed: paint system, number of coats, sheen levels per room, and any special surfaces.
- Gather your tools: phone or camera, flashlight, step stool or ladder, painter’s tape and a marker for flagging, colour sample chips, and a moisture meter if damp is suspected.
- Schedule the walk as close to the painter’s completion day as possible, and ideally before flooring installation and final cabinetry are in place. Timing the walk early creates a dated record of wall condition and separates paint defects from damage caused by later trades.
During the walk
- Move room by room in a fixed sequence (clockwise from the door, for example) so nothing is missed.
- Check each wall at normal viewing distance first, then close up, then with the flashlight at a raking angle.
- For trim and doors, crouch to eye level and look along the surface for runs, sags, and brush marks.
- Flag each defect with a numbered tape marker. Photograph wide context first (the whole wall), then a close-up with the defect circled or the tape flag visible. Timestamp or immediately log the photo filename against the item number.
- Check hidden edges: back of doors, tops of door frames, behind radiators, and any surface the scope required but that is easy to skip.
- Run the tape adhesion test on at least one representative area per room, more if blistering or peeling is visible anywhere.
After the walk
- Transfer flagged items into the snag list template the same day. Do not rely on memory or a photo folder alone.
The goal of every entry is that a crew member can read it and fix the defect without calling anyone. That standard, described in detail in how to create a painting punch list, is what separates a useful snag list from a vague complaint log.
- Bring Benjamin Moore or equivalent colour chips to compare against finished walls when colour accuracy is in scope.
- Use a consistent photo naming convention from the first shot: jobcode_room_itemnumber_date.jpg.
- If door edges are a known issue on the project, the guidance on finishing interior door edges is worth reviewing before the walk so you know what a properly finished edge looks like.
What to include in each snag list entry
Every line item on the list should function as a mini work order. A painter reading it should know exactly where to go, what to fix, and how.
| Field | Definition | Example value |
|---|---|---|
| Item ID | Unique number for tracking | SNL-014 |
| Room / location | Room name plus a landmark | Master bedroom, east wall, left of window |
| Photo(s) | Filename or URL of context and close-up shots | MB_eastwall_014_20260603.jpg |
| Defect description | Specific fault observed | Lap mark, approx. 600mm horizontal band at mid-wall height |
| Required correction | How to fix it | Sand lightly, spot-prime, apply one full coat of agreed finish |
| Responsible party | Who owns the fix | Painting contractor |
| Required material | Paint, primer, or tool needed | Eggshell finish, Lot 4B (matched to original batch) |
| Priority / severity | Minor / major / must-fix | Major |
| Target completion date | Agreed deadline | June 10, 2026 |
| Status | Open / in progress / done | Open |
| Sign-off proof | After photo filename and date | MB_eastwall_014_after.jpg |
Sample filled entry:
SNL-014 | Master bedroom, east wall, left of window | Photo: MB_eastwall_014_20260603.jpg | Defect: Lap mark, horizontal band approx. 600mm at mid-wall height, visible under raking light | Correction: Light sand, spot-prime, one full coat eggshell to full wall | Responsible: Painting contractor | Material: Eggshell, original batch | Priority: Major | Target: June 10, 2026 | Status: Open
A few rules that keep the list functional:
- Log every item with a date stamp the day it is identified.
- Treat the final list as a closed set. Any new work requested after the list is agreed goes through a formal change order, not onto the punch list.
- Require an after photo and a sign-off date for every item before marking it done.
Punch items with a photo, a circled defect, and a single specific correction are materially more likely to get completed. Vague entries like “touch up bedroom” generate arguments; specific entries generate fixes.
Who fixes snag items, realistic timelines, and PCA P20 guidance
Accountability on a snag list follows the scope of work. The painting contractor owns defects that result from their application, prep, or materials. Damage caused by other trades after the paint was applied, or deterioration from owner actions, is not a punch item for the painter.
The PCA P20 standard sets the industry expectation: the painting contractor cooperates on initial and final punch lists prepared around substantial completion, completes listed items within a reasonable time, and provides documentation of completion on request. That language creates a shared baseline both inspectors and contractors can reference.
Practical timelines that work in most residential and light commercial projects:
- Day 0: Painter’s internal walk and self-correction before calling the job complete.
- Days 1–10: Formal client or inspector punch walk, list agreed, corrections batched into one visit. The window depends on scope and whether touch-up materials are on hand or need to be ordered.
- Within 7 days of correction: Client validation walk and written sign-off.
Pro Tip: Any item raised after the sign-off date that was not on the agreed list should be logged as a new request and handled through a change order. Keeping this boundary firm prevents the punch list from becoming a permanent open tab.
Dispute resolution is straightforward when the paperwork exists: dated before photos, a signed acceptance at handover, and a log of any post-handover requests as separate change orders. Without that paper trail, “he said / she said” arguments about whether a defect was pre-existing or new are almost impossible to resolve cleanly.
Managing remedial repairs and the re-inspection cycle
The goal is one focused correction visit, not a rolling series of partial fixes. Batch all open items, confirm materials are available, and schedule the crew for a single return trip.
Best-practice closure workflow:
- Assign every open item to a responsible party and a target date before the correction visit is scheduled.
- Confirm materials (paint batch, primer, filler) are on hand before the crew arrives. A return visit that stalls because the right sheen is out of stock wastes everyone’s time.
- Fix items in batch during a single visit where practical. Re-inspect the same day if the fixes are dry enough, or schedule re-inspection within 24–48 hours.
- Use the same inspector for re-inspection where possible. They know the original defect and can judge whether the correction meets the acceptance standard.
- Photograph each corrected item before and after. The after photo closes the item in the log.
Status tracking does not need to be complex. A shared Google Sheet with columns for Item ID, Status (open / in progress / done), and Sign-off date is enough for most projects. The Item ID ties back to the invoice line when billing for correction work.
When a punch item grows into something larger, convert it. A touch-up that reveals a full adhesion failure across a wall is no longer a punch item; it is a scope change. Log it as a change order, agree on the cost and timeline separately, and keep it off the original punch list so the original list can still close.
Simple tools and templates that make paint snagging faster
No specialized software is required. A spreadsheet and a phone camera handle most projects cleanly.
Spreadsheet header (copy into Google Sheets or Excel):
- Item ID | Room | Landmark | Photo filename/URL | Defect | Correction | Responsible | Materials | Target date | Status | Sign-off
Photo naming convention:
jobcode_room_itemnumber_date.jpg- Example:
SMITH_MBED_014_20260603.jpg
This naming convention means any photo can be matched to its snag entry without opening a folder and guessing.
Lightweight tools worth knowing:
- Google Sheets or Excel: free, shareable, and sufficient for projects up to 50 items.
- Snagr, PunchPad, or similar lightweight punch-list apps: useful when photos need to be attached directly to line items and shared with a crew in the field. These are examples, not endorsements.
- Shared Google Drive or Dropbox folder: keeps photos accessible to both inspector and contractor without email chains.
- Timestamp camera apps: embed date and time directly into the photo, removing any ambiguity about when a defect was recorded.
Mini template (copy into an email or spreadsheet row):
ID: ___ | Room: ___ | Location: ___ | Photo: ___ | Defect: ___ | Fix: ___ | Owner: ___ | Material: ___ | Due: ___ | Status: Open
Benjamin Moore’s essential supplies list is a useful reference for confirming that the right tools and materials were used in the first place, which is relevant when a defect might trace back to a wrong roller nap or an inadequate brush.
The punch list detail most painters get wrong
There is a version of the punch list that looks thorough and accomplishes almost nothing: a room-by-room list of vague complaints with no photos, no assigned owner, and no correction instruction. “Touch up living room” is not a snag entry. It is an argument waiting to happen.
The detail that separates a functional punch list from a useless one is specificity at the correction level. Not “fix the wall” but “sand the lap mark at mid-height on the east wall, spot-prime, and apply one full coat of eggshell to the full wall width.” That level of detail means a crew member can walk in, do the work, and walk out without a phone call. It also means the inspector can re-inspect against a clear standard.
The other thing painters underestimate is timing. Running the paint walk before flooring and final cabinetry go in is not just convenient; it is protective. A scuff on a wall that appeared after the flooring crew worked through the room is not a paint defect. But if there is no dated photo of the wall condition before the flooring went in, that argument is very hard to win. The inspection timing is part of the documentation strategy, not just a scheduling preference.
Capeapexpainters handles the inspection and sign-off for you

Closing a painting project cleanly, with a documented snag list, dated photos, and a signed handover, takes discipline that not every painting crew builds into their process. Capeapexpainters does. The in-house team (no subcontractors) runs an internal punch walk before every handover, documents corrections with before-and-after photos, and produces a signed sign-off record as standard. For property owners, estate managers, and body corporate trustees in Cape Town, the Cape Winelands, and the Overberg, that means no open-ended rework conversations and no ambiguity about what was agreed. Get a quote and schedule an assessment at Capeapexpainters.
Sources
These are the primary references used to build this guide. Each one adds something specific.
- PCA P20 Recommended Protocol for Job Close Out of Painting and Decorating Projects
- How to Create a Painting Punch List
- How to Get Your Painter to Actually Finish the Punch List
- Paint Inspection Checklist When Hiring a Pro Painter
- Painting Project Checklist | Sherwin-Williams