
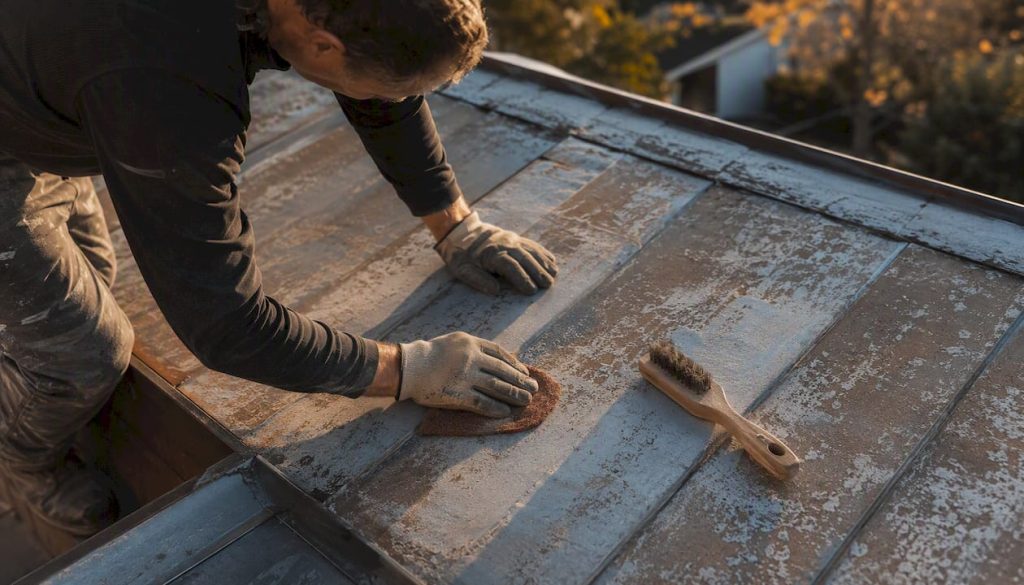
Painting a metal roof is a cost-effective, proven option for any structurally sound roof with a faded, chalking, or lightly rusted finish. If your panels are intact, seams are tight, and rust is isolated rather than widespread, a repaint can add significant additional years of finish life at a fraction of replacement cost. Skip the repaint if you have perforated panels, active leaks, or panels so thin they flex underfoot.
Paint now if you have:
- Faded or chalking factory finish with no structural damage
- Isolated rust spots on otherwise solid panels
- Good panel fit and intact seams
Consider replacement instead if you have:
- Perforated or corroded-through panels
- Recurring leaks at seams or fasteners
- Widespread rust covering more than a third of the surface
- Panels that flex or oil-can under light foot pressure
Your immediate next step: walk the roof (safely) or hire a contractor for a short condition assessment before buying a drop of paint.
Table of Contents
- What metal types and factory coatings are you working with?
- How to prepare your metal roof surface properly
- How to choose the right primer and paint system
- How to apply the paint: tools, coats, and weather windows
- What does metal roof painting actually cost?
- Safety, warranties, and HOA considerations
- Should you DIY or hire a contractor?
- PVDF vs SMP vs acrylic: what the coating chemistry actually means
- Key takeaways
- What professionals notice that homeowners miss
- Capeapexpainters handles the prep work that makes repaints last
- Useful sources and further reading
What does it actually cost to paint versus replace?
According to sourced industry estimates, professional repainting typically runs in a lower cost range per square foot than panel replacement, which is substantially more expensive. On a 2,000 sq ft roof, that gap is roughly $16,000–$25,000. Even accounting for a repaint that lasts only ten years before another coat is needed, the lifecycle math usually favors painting on a sound substrate.
One important caveat: repainting often voids the original factory coating warranty. Most manufacturers consider the factory finish a closed system, and applying field coatings over it transfers responsibility to whoever specified the field product. That is not a reason to avoid repainting, but it is worth documenting which products you used and following their technical data sheets (TDS) precisely so you have a paper trail if questions arise later.
What metal types and factory coatings are you working with?
Knowing your substrate and its factory finish before you buy primer is not optional. The wrong primer on the wrong surface is the single most common reason a repaint fails within two years.
Common substrates:
- Galvanized steel: Steel coated with a zinc layer for corrosion protection. The zinc surface is chemically active and repels many paints unless properly prepared. Very common on agricultural and residential roofs.
- Galvalume®: An aluminum-zinc alloy coating on steel. More corrosion-resistant than standard galvanized, slightly different prep requirements, and generally more forgiving to paint.
- Aluminum: Lightweight, naturally corrosion-resistant, but requires an etching primer because its oxide layer is notoriously non-stick.
Factory coating hierarchy (from least to most durable):
- Polyester: The entry-level factory finish. Fades and chalks relatively quickly, often within 10–15 years in high-UV climates. Easiest to repaint because the surface profile is already degraded.
- SMP (Silicone-Modified Polyester): A mid-tier system with better UV and chalk resistance than standard polyester. AkzoNobel’s CERAM-A-STAR® 1050 is one example of a manufacturer-tested SMP coil coating that cites improved gloss retention and color stability. Repaintable with the right bonding primer.
- PVDF / Kynar 500®: The premium factory finish. Fluoropolymer chemistry gives it superior color and gloss retention compared to both SMP and polyester, with some specifications claiming 30+ years of appearance life. The trade-off: PVDF’s low surface energy makes adhesion genuinely difficult, and repainting it requires specialized prep.
Factory finishes are applied under controlled heat in a coil-coating facility. Field-applied coatings cure at ambient temperature, which means they will never match factory performance. A well-specified field system on a polyester or SMP substrate is realistic and durable. Repainting PVDF is possible but harder, and many contractors and manufacturers discourage it without a thorough mechanical scuff and a PVDF-compatible bonding primer.
How to prepare your metal roof surface properly
Surface preparation determines whether your coating lasts five years or fifteen. No primer or topcoat compensates for a surface that was not properly cleaned, profiled, and repaired. Follow these steps in sequence.
- Classify the surface condition. New galvanized steel has a smooth, zinc-rich surface that actively resists paint. Partially weathered galvanized (6–24 months of exposure) has begun to oxidize and accepts paint more readily. Fully weathered galvanized has a dull, matte gray surface that is generally the easiest to paint. ASTM D6386 guidance describes preparation protocols for each condition, and following them is the baseline for any professional job.
- Wash the entire surface. Use a TSP substitute or a dedicated metal roof cleaner at the manufacturer’s recommended dilution. Pressure-wash at 1,500–2,500 psi, working with the panel profile rather than across it. Avoid washing in direct sun on hot metal: water evaporates before it can lift contaminants, and flash-dry leaves mineral deposits behind.
- Treat rust. Wire-brush or angle-grind any rust back to bare, bright metal. Apply a rust converter or spot-prime the same day. Bare steel left overnight will flash-rust, especially in humid climates, and you will be starting over.
- Etch or mechanically profile galvanized surfaces. New or lightly weathered galvanized steel needs either a wash primer (acid-etch type) or mechanical scuffing with 80-grit abrasive to give the zinc surface enough profile for adhesion. For smaller areas, a diluted acid-etch solution or commercial galvanized primer works well; for large roofs, a wash primer applied by spray is faster and more consistent.
- Repair fasteners and seams. Replace any backed-out or stripped screws with oversized gasketed screws (one size up in diameter). Reseal end laps and penetrations with urethane or butyl sealant. Avoid silicone: it does not accept paint and will leave bare patches wherever it contacts the topcoat.
- Run an adhesion test patch. Before committing to a full application, apply primer and one coat of topcoat to a 12-inch square in an inconspicuous area. Let it cure for the full time listed on the TDS, then run a cross-hatch adhesion test (ASTM D3359). If paint lifts cleanly, the prep sequence needs adjustment before you proceed.
Pro Tip: On PVDF-coated panels, mechanical scuffing with 80-grit followed by a PVDF-compatible bonding primer is more reliable than acid-etch alone. The fluoropolymer surface is chemically inert, so physical profile is what the primer grabs.
How to choose the right primer and paint system
The primer is not just a base coat. It is the chemical bridge between your substrate and the topcoat, and choosing the wrong one means the topcoat is essentially floating on a surface it cannot bond to.
Primer types by substrate
| Substrate | Recommended primer type | Notes |
|---|---|---|
| New galvanized steel | Wash primer / self-etching primer | Acid-etch chemistry keys into zinc; apply within 4 hours of surface prep |
| Weathered galvanized / Galvalume® | Acrylic bonding primer or zinc-rich primer | Clean surface thoroughly; zinc-rich adds corrosion protection |
| Bare steel (rust-treated) | Rust-inhibiting primer (Rust-Oleum, Zinsser) | Apply same day as rust treatment to prevent flash rust |
| Factory polyester or SMP | DTM (direct-to-metal) acrylic bonding primer | Sherwin-Williams DTM Bonding Primer is a widely specified option |
| Factory PVDF / Kynar | PVDF-compatible bonding primer + mechanical scuff | Repainting factory PVDF is difficult and often discouraged without specialist prep |
| Aluminum | Etching primer | Aluminum’s oxide layer requires chemical keying |
Topcoat systems compared
| System | Expected field life | UV/chalk resistance | Best use case | Application complexity |
|---|---|---|---|---|
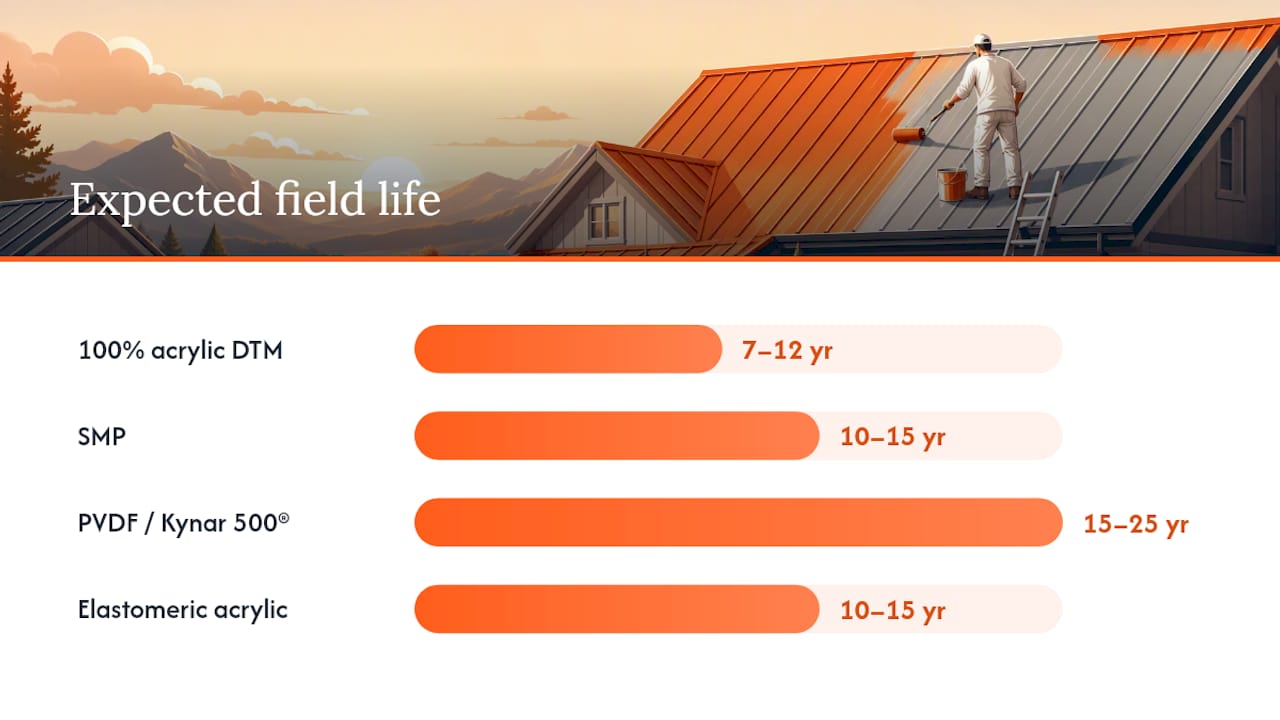
| 100% acrylic DTM (e.g., Sherwin-Williams Sher-Cryl HPA) | 7–12 years | Moderate | Residential repaint on polyester/SMP panels | Spray or roll; low complexity |
| SMP (Silicone-Modified Polyester) | 10–15 years | Good | Commercial or high-exposure residential | Usually spray; moderate |
| PVDF / Kynar 500® field-applied | 15–25 years (with correct prep) | Excellent | High-exposure, long-lifecycle projects | Spray only; high complexity; specialist required |
| Elastomeric acrylic | 10–15 years | Moderate | Flat or low-slope metal; waterproofing priority | Roll or spray; low-moderate |
A standard residential repaint on a polyester or SMP factory finish typically uses a DTM bonding primer plus two coats of an acrylic topcoat. Sher-Cryl HPA over Sherwin-Williams DTM Bonding Primer is one of the most commonly specified systems for prefinished panels in the U.S. market. Always pull the TDS for the exact products you plan to use: spread rates, recoat windows, and compatibility notes vary between manufacturers and even between product lines from the same brand.
How to apply the paint: tools, coats, and weather windows
Application by roof profile
Standing seam and ribbed panel roofs are best painted with an airless sprayer followed immediately by back-rolling. The sprayer gets paint into the ribs and seam edges; the roller works it into the profile and eliminates dry-spray. Corrugated roofs benefit from the same spray-and-backroll approach, though a thick-nap roller (¾ inch) reaches the valleys better than a standard ¼-inch nap.
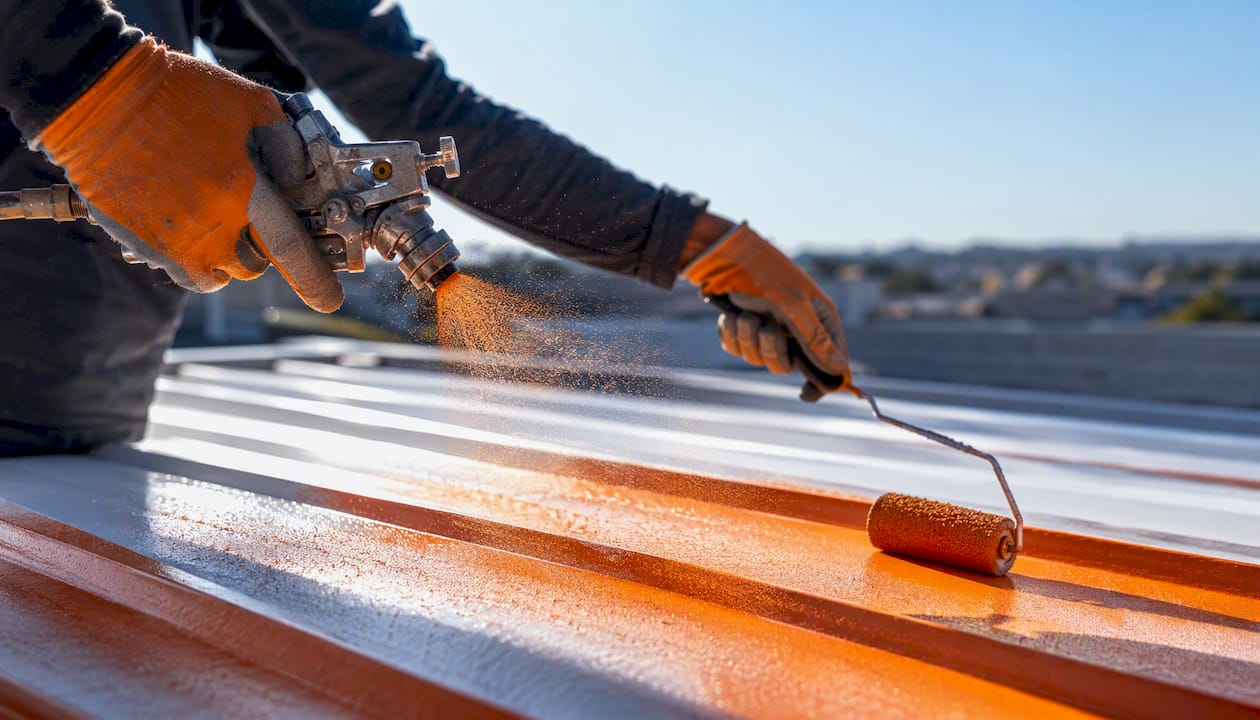
Brush work is for fastener heads, cut edges, and touch-ups only. Trying to brush-coat an entire metal roof is slow, produces uneven film thickness, and usually results in a job that fails at the edges first.
Coat schedule and coverage
A typical system runs: one coat of primer, then two coats of topcoat. Most 100% acrylic topcoats cover a moderate range of square feet per gallon at the recommended wet film thickness. For a 2,000 sq ft roof, budget for roughly 6–8 gallons of topcoat per coat, plus 5–6 gallons of primer. Always calculate from the TDS spread rate, not the label claim, because label claims are often measured on flat surfaces rather than profiled metal.
| Coat | Typical dry time before recoat | Notes |
|---|---|---|
| Primer | 2–4 hours (acrylic); 30–60 min (wash primer) | Check TDS; recoat window matters as much as dry time |
| First topcoat | 4–6 hours at 70°F / 50% RH | Longer in cool or humid conditions |
| Second topcoat | 24 hours before light foot traffic | Full cure: 7–14 days depending on product |
Weather windows
Paint between 50°F and 90°F surface temperature. Below 50°F, acrylic coatings cure slowly and may not form a proper film. Above 90°F on a metal surface (which can reach 150°F+ in direct sun), solvent flashes before the film levels, leaving a rough, porous surface. Following product cure times and weather windows is one of the most practical steps you can take to avoid early failure.
- Avoid painting within 24 hours of forecast rain.
- Stop work at least two hours before expected dew point.
- Ideal relative humidity: 40–70%.
- Morning application on hot days lets the surface cool before the afternoon peak.
Pro Tip: Check surface temperature with an infrared thermometer, not just air temperature. A metal roof in direct sun can be 40–60°F hotter than the ambient air, pushing it well outside the application window even on a mild day.
What does metal roof painting actually cost?
Cost varies significantly by roof pitch, access difficulty, rust extent, and product specification. National estimates from Homewyse put professional metal roof painting at $1.83–$3.59 per square foot, though site-specific factors push jobs outside that range regularly.
Cost breakdown for a 2,000 sq ft roof
| Item | DIY estimate | Professional estimate |
|---|---|---|
| Surface cleaner and prep materials | $80–$150 | Included in labor |
| Primer (5–6 gallons) | — | Included in material cost |
| Topcoat (12–16 gallons, 2 coats) | — | Included in material cost |
| Sprayer rental (airless) | $80–$150/day | Not applicable |
| Safety gear (harness, anchors) | — | Not applicable |
| Labor | — | $2,500 |
| Total estimate | $830 | $3,660 |
Hidden costs that catch homeowners off guard: scaffolding on steep or two-story roofs ($500–$1,500), rust remediation beyond surface treatment, fastener replacement, and sealant work at penetrations. Get an itemized quote that separates prep labor from application labor so you can see where the money goes.
A typical 2,000 sq ft roof takes several days for a professional crew to complete: one day for washing and repairs, one day for priming, and one to two days for topcoats, with weather holding the schedule more than anything else.
Safety, warranties, and HOA considerations
Warranty and HOA implications
Repainting a metal roof usually voids the original factory coating warranty. Manufacturers design their warranties around the factory-applied system, and field coatings introduce variables they cannot control. That said, most factory warranties on residential metal roofs are 25–40 years for the coating but only 1–5 years for labor, so the practical impact depends on how old the roof is.
Before changing roof color, check your HOA rules and local permit requirements. Some municipalities require a permit for exterior color changes; others do not. HOAs often have approved color palettes, and getting approval in writing before you start protects you from a costly redo.
Reflective or “cool roof” coatings in light colors can reduce attic temperatures meaningfully in hot climates, which may qualify for utility rebates in some states. Check with your local utility before specifying a color.
Should you DIY or hire a contractor?
DIY suitability checklist
DIY is realistic if: the roof pitch is 4:12 or less, you are comfortable working at height, rust is limited to a few isolated spots, and you have access to an airless sprayer. It is not realistic if: the roof is steep, access requires scaffolding, rust remediation is extensive, or the factory finish is PVDF (which requires specialist prep and products most homeowners cannot source easily).
Deciding between a DIY roof project and hiring a professional is similar to weighing any structural home improvement: the complexity of the substrate and the consequences of failure should drive the decision, not just the upfront cost difference.
Questions to ask a contractor
- Are you licensed, bonded, and insured for roofing work in this state?
- What products will you use, and can you provide the TDS for each?
- How will you handle rust remediation and fastener replacement?
- What is your warranty for labor, and what does it cover?
- Can you provide photos of completed metal roof repaints and two references?
- How do you test adhesion before full application?
Red flags: vague answers about prep (“we’ll clean it up”), refusal to share product specs, no proof of insurance, and pushing the cheapest available paint without TDS documentation. A contractor who cannot name the primer they plan to use on your specific substrate is not ready for the job.
PVDF vs SMP vs acrylic: what the coating chemistry actually means
At a basic level, all paint systems consist of a resin (the binder), pigment (color and opacity), and solvent (the carrier that evaporates during cure). The resin chemistry determines almost everything about long-term performance.
PVDF (polyvinylidene fluoride) uses a fluoropolymer backbone that is exceptionally resistant to UV radiation, oxidation, and chemical attack. The carbon-fluorine bond is one of the strongest in organic chemistry, which is why PVDF factory coatings retain color and gloss for decades while field-applied acrylics commonly need repainting within a decade or two depending on climate and exposure. Factory PVDF specifications often cite multiple decades of appearance life in controlled testing.
SMP (Silicone-Modified Polyester) blends silicone into a polyester resin, improving UV resistance over standard polyester without reaching PVDF’s performance ceiling. It is a practical mid-tier choice for commercial applications where lifecycle cost matters but the budget does not support PVDF. AkzoNobel’s CERAM-A-STAR® 1050 is one manufacturer-tested SMP system that cites improved gloss retention and color stability in its product literature, though those claims should always be verified against the actual TDS for your application.
100% acrylic field coatings are the workhorses of residential repainting. They cure at ambient temperature, are widely available, and are compatible with most bonding primers. Their limitation is longevity: even a well-applied acrylic system on a properly prepped surface will typically need refreshing within a decade in high-UV or coastal climates.
The most common reason a field-applied coating fails prematurely is not the topcoat chemistry — it is inadequate surface preparation. A premium acrylic over a properly etched, primed, and profiled surface will consistently outlast a PVDF topcoat applied over a surface that was only pressure-washed.
The adhesion challenge with PVDF is real. Its low surface energy means most primers simply do not wet out the surface properly. Mechanical scuffing with 80-grit abrasive increases surface area and creates mechanical anchor points. A PVDF-compatible bonding primer then provides the chemical bridge. Skip either step and the coating will delaminate, often in sheets, within a season or two.
Key takeaways
A structurally sound metal roof with a faded or chalking finish is almost always worth repainting rather than replacing, provided surface preparation follows substrate-specific protocols and products are selected from manufacturer TDS guidance.
| Point | Details |
|---|---|
| Inspect before you commit | Check for perforations, seam separation, and widespread rust before buying materials. |
| Prep determines longevity | A correct prep sequence adds 10–15 years of finish life; skipping it is the primary reason repaints fail early. |
| Match primer to substrate | New galvanized needs a wash/self-etching primer; PVDF panels need mechanical scuffing plus a PVDF-compatible bonding primer. |
| Budget realistically | Professional repainting runs at a moderate cost per square foot; hidden costs like scaffolding and rust remediation are common. |
| Capeapexpainters approach | Prep-first assessment and substrate-matched coating specification for roofs in coastal and high-UV climates. |
What professionals notice that homeowners miss
The single most consistent mistake on DIY metal roof repaints is skipping the profiling step on galvanized surfaces. Homeowners pressure-wash, see a clean surface, and prime immediately. The zinc is still chemically smooth, and the primer sits on top of it rather than bonding to it. Six months later, the coating lifts in sheets at the first thermal cycle.
The second most common mistake is underestimating rust remediation. Surface rust that looks minor from the ground often covers a much larger area once you are on the roof with a wire brush. Spot-treating five square feet of rust is a morning’s work. Treating fifty square feet of rust that was not budgeted for adds a full day and significant material cost to the project.
What professionals do differently comes down to documentation. A good contractor pulls the TDS for every product before quoting, runs an adhesion test patch before full application, and schedules the job around a weather window rather than a calendar date. They also plan for a post-job touch-up visit at 30 days, when any adhesion issues from missed prep spots become visible and are still easy to fix.
The other thing worth saying plainly: a repaint is maintenance, not a permanent fix. Even the best field-applied system on the best-prepped surface will need attention again in 10–15 years. Build that into your property maintenance schedule rather than treating it as a one-time event.
Capeapexpainters handles the prep work that makes repaints last
The difference between a metal roof repaint that lasts a decade and one that peels within two years is almost entirely in the preparation, and preparation is exactly where most DIY and budget-contractor jobs cut corners.

Capeapexpainters brings a prep-first approach to every roof painting project: diagnostic surface assessment before a single product is specified, substrate-matched primer selection, rust remediation handled on-site, and coating systems chosen from manufacturer TDS guidance rather than whatever is cheapest at the trade counter. The team is fully in-house, which means the same people who assess the roof are the ones applying the coating, with no handoff to subcontractors who did not see the original condition.
If you are weighing a repaint for a residential or commercial property, the right starting point is an on-site assessment. Request a quote from Capeapexpainters to get a clear picture of substrate condition, recommended coating system, and a realistic cost and timeline before you commit to anything.
Useful sources and further reading
The sources below were used to build this guide. Before buying or applying any coating system, download the TDS for the specific products you plan to use: spread rates, recoat windows, and compatibility notes are product-specific and the label alone is not enough.
- Best Coating for Metal Roofs: SMP vs PVDF Explained
- The paint over HDG — Paint guide (Galvanize It!)
- How to Paint Galvanized Metal: Complete Guide for Professional Results — PaintPetal
- Cost to Paint Metal Roof — 2026 Cost Calculator (Customizable)
- Can I Paint My Metal Roof to Change its Color? (2026 Update)
- What is the best paint for metal roofing durability
- Painting a Galvanized Roof: A Complete Guide — New England Metal Roof