
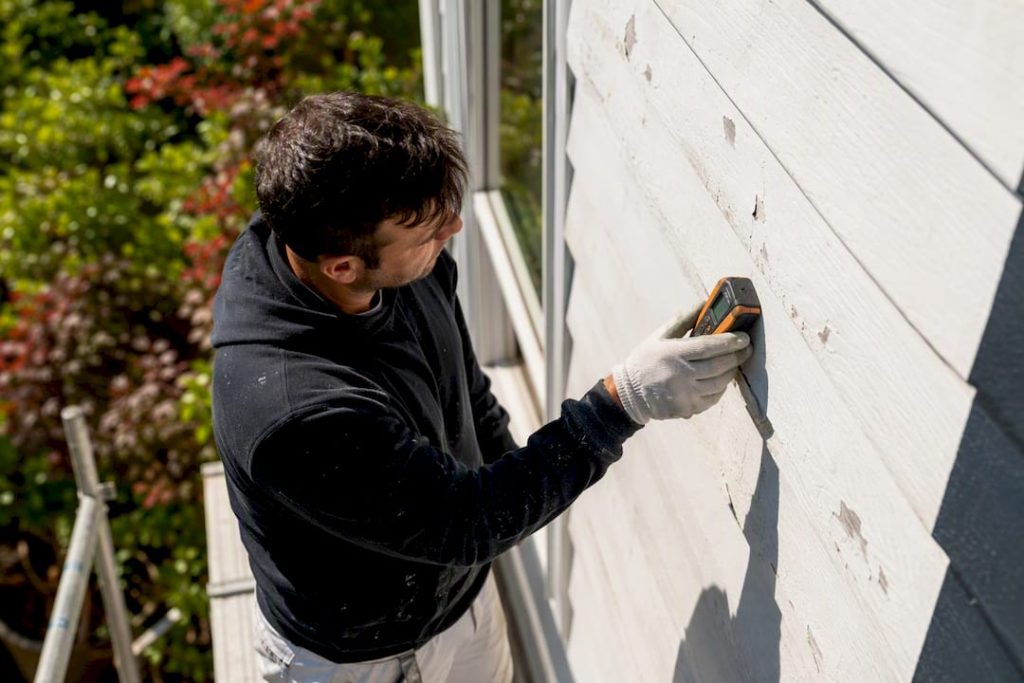
The quickest way to extend an exterior paint job is a simple cyclical routine: inspect every several months, clean annually, and repair damage the moment you spot it. Then repaint on schedule, not when the wall finally embarrasses you.
Most homeowners treat exterior paint as a set-and-forget purchase. It isn’t. The PCA Industry Standard P8 frames coating care as a scheduled maintenance program, not a reactive scramble, and that distinction is the difference between a wall that lasts a decade and one that needs stripping back to bare timber in five years.
Here’s the routine, stripped to essentials:
- Inspect every 6 to 12 months and write down what you find
- Wash the exterior at least annually with a soft-wash method, never a blasting pressure washer
- Touch up chips, cracks, and peeling the week you notice them, not the season after
- Chase down moisture sources, failing caulk, and soft substrate before any new coat goes on
- Schedule a full repaint once failures cover more than 10% of a wall or the coating hits the end of its expected life
Pro Tip: Preparation determines outcome more than the paint tin does. A premium acrylic applied over damp, unprepped timber will fail faster than a mid-range paint applied correctly.
Key Takeaways
A painted exterior lasts longest when owners inspect twice a year, clean once a year, fix small defects immediately, and repaint on a schedule tied to material lifespan rather than appearance.
| Point | Details |
|---|---|
| Inspect on a cadence | Quick check every 6 months, detailed logged inspection annually, per PCA Industry Standard P8. |
| Clean with a soft wash | Wash exterior walls at least once a year using low pressure to prevent forcing water behind cladding. |
| Match repair to cause | Peeling and blistering usually trace to moisture, chalking to UV; fix the source, not just the symptom. |
| Prep before repaint | Clean, dry, scrape, prime, and caulk in order; skipping steps voids many manufacturer warranties. |
| Know your material’s lifespan | Timber needs repainting every 5 to 7 years; stucco, fibre cement, and metal typically last 7 to 10 years. |
| Hire prep-first when it’s beyond DIY | Cape Apex Painters uses in-house crews and diagnostic assessments for widespread failure or damp issues. |
Table of Contents
- How often should you inspect a painted exterior?
- What’s the safest way to clean painted walls?
- Why is your paint peeling, blistering, or chalking?
- Touch up or repaint? Here’s how to decide
- What proper surface prep looks like before repainting
- What paint actually holds up outdoors
- A seasonal calendar for exterior paint care
- When should you call in a professional painter?
- Where this maintenance advice comes from
- The uncomfortable truth about paint maintenance
- Get a diagnostic-first repaint instead of guessing
- Sources
How often should you inspect a painted exterior?
A quick walk-around every six months catches problems while they’re still cheap to fix. Once a year, do it properly: a slow, methodical pass with a notebook or phone camera, checking every elevation in daylight.
Look for five specific things: blistering (bubbles under the film), peeling (paint lifting in sheets or flakes), chalking (a powdery residue that rubs off on your hand), mildew (dark speckled patches, usually on shaded or damp-prone walls), and soft or spongy wood, especially around window sills and fascia boards. Check caulk lines at joints and trim too. Cracked or shrunken caulk lets water behind the film, which is how a cosmetic issue becomes a structural one.
Note which direction each wall faces. North and west-facing walls (in the southern hemisphere) usually take the harshest UV load and fade or chalk first, while south and east-facing walls tend to hold moisture longer and mildew more. Record the finish type too, since gloss trim and flat wall paint fail differently and age at different rates.
A basic annual log works like this:
- Walk each elevation and photograph any defect
- Rate severity: cosmetic, moderate, or urgent
- Note orientation and approximate age of the last coat
- Flag urgent items (active water ingress, soft substrate, exposed timber) for immediate action
- File the log so next year’s inspection has a baseline to compare against
Cosmetic chalking can wait for the next cleaning cycle. Soft substrate or active water ingress cannot. Treat those as urgent, because a small area of rot spreads under the surface long before it’s visible from the ground.
What’s the safest way to clean painted walls?
Soft washing beats pressure washing almost every time on painted exteriors. Dilute a mild detergent or dedicated house-wash product, work it in with a soft-bristle brush, and rinse at low pressure. High-pressure settings force water behind cladding and lap joints, which causes blistering that only shows up weeks later.
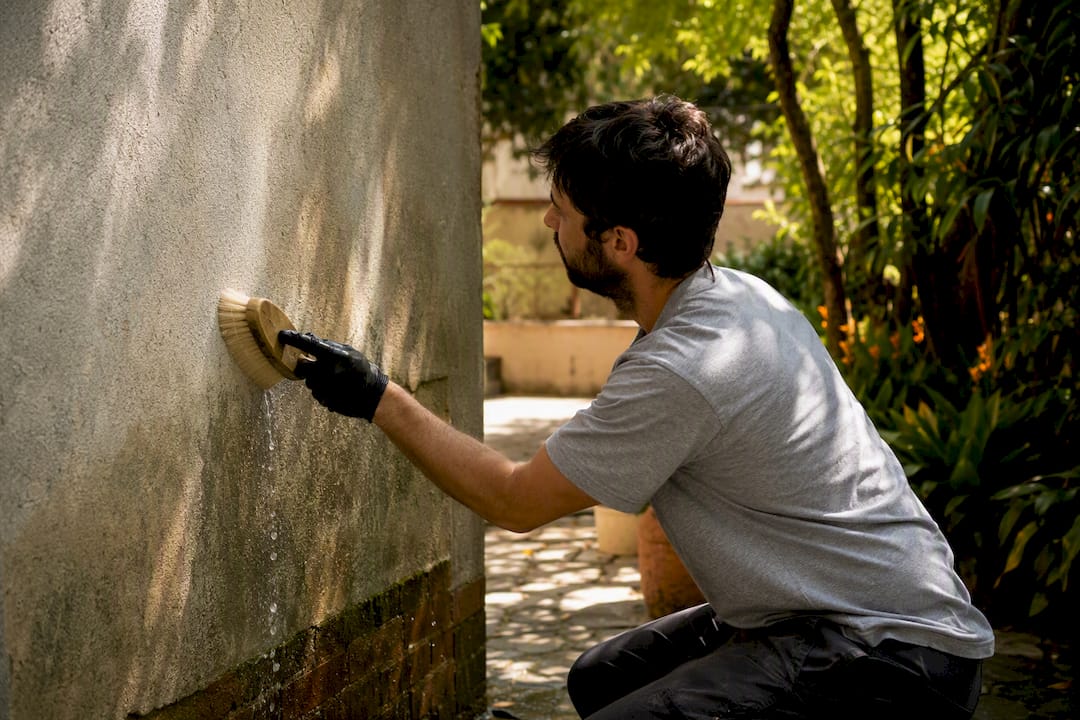
South African maintenance guidance is direct on this point: wash exterior walls at least once a year to strip off dirt, grime, and mildew before it embeds in the film. Skip a year and you’re not just dirtier, you’re accelerating chalking and giving mildew spores a head start on next season’s growth.
For mildew-specific stains, a diluted bleach solution or a proprietary mildicide wash works better than detergent alone. Mix it according to the label, apply with a pump sprayer or brush, let it dwell for the recommended time, then rinse thoroughly. Protect plants beneath the work area first: soak them with plain water before and after, and never let concentrated bleach solution pool at the base of a shrub.
A few rules worth following every time:
- Work top to bottom so dirty runoff doesn’t restain a section you’ve already cleaned
- Keep pressure washers under 1,500 PSI if you use one at all, with a wide fan tip held well back from the surface
- Never point any pressure stream directly at window seals, vents, or siding laps
- Let the wall dry fully, at least 24 to 48 hours in good weather, before doing any touch-up work or recoating
Pro Tip: If a stain reappears within weeks of cleaning, it’s not dirt, it’s an active mildew colony feeding on moisture trapped behind the paint. That’s a maintenance flag, not just a cleaning one.
Annual cleaning isn’t cosmetic housekeeping. It’s one of the highest-return maintenance tasks you can do, because it routinely prevents the kind of substrate damage that turns a repaint into a rebuild.
Why is your paint peeling, blistering, or chalking?
Every failure mode points to a cause, and matching the two correctly is what separates a real fix from a cosmetic patch that fails again next season.
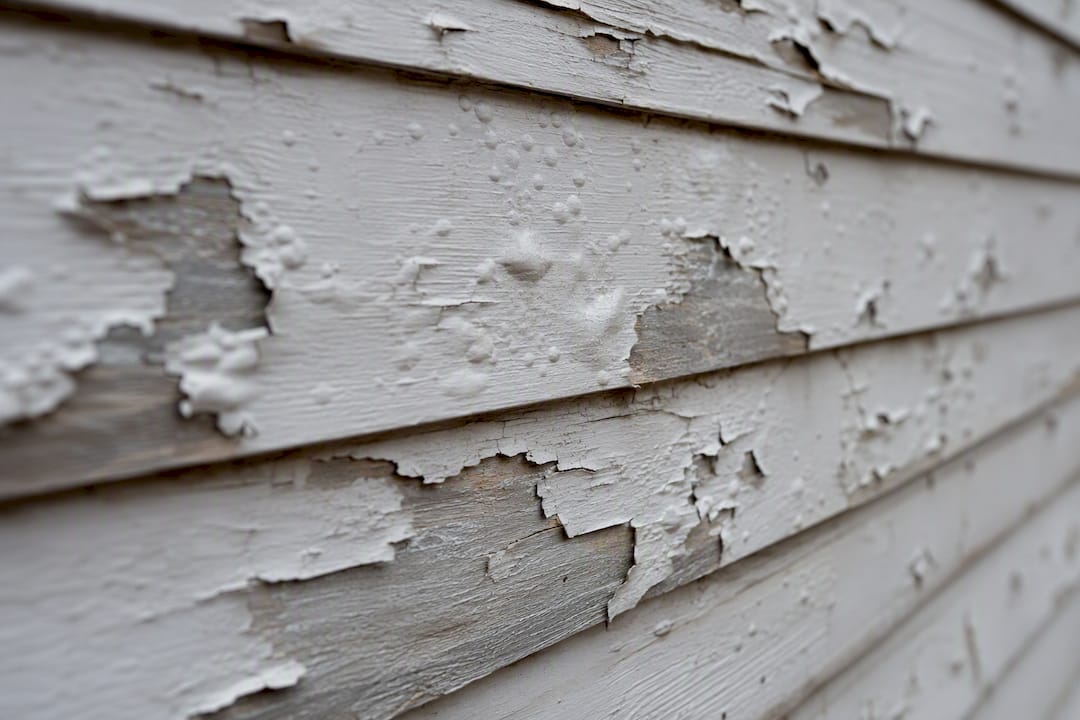
Peeling almost always means moisture is getting behind the film, either from a leak, poor drainage, or paint applied over a damp surface. Blistering is trapped moisture or heat pushing the film away from the substrate, often from painting in direct sun or over a surface that wasn’t fully dry. Chalking is UV breakdown of the paint’s binder, a wall gradually giving up its pigment to the sun and weather. Mildew needs moisture, shade, and organic residue to establish itself, which is why it clusters on north-facing or poorly ventilated walls in humid seasons.
For isolated spot repairs, the sequence matters:
- Scrape away all loose or flaking paint with a stiff scraper, working back to sound material
- Feather the edges with sandpaper so the repair doesn’t leave a visible ridge
- Sand any bare substrate lightly to give the primer something to grip
- Spot-prime any bare wood, metal, or masonry, since bare substrate left unprimed is where the next failure starts
- Apply a compatible topcoat, matching sheen and formulation to what’s already on the wall
One caution worth taking seriously: if your home was painted before the early 1990s and you’re scraping or sanding old coatings, treat the dust as though it could contain lead until you confirm otherwise. Wet-sand where possible and avoid open-flame paint removal.
Spot repairs work for isolated defects on a sound substrate. They don’t work when the wood underneath has gone soft, when a stain keeps bleeding back through fresh paint, or when the moisture source is structural (a failed gutter, damaged flashing, rising damp). At that point you’re not patching paint, you’re patching a symptom, and it’s time to call in someone who can diagnose the actual cause.
Touch up or repaint? Here’s how to decide
The rule of thumb is straightforward: touch up when defects are small, scattered, and the substrate underneath is sound. Move to a full repaint once failures spread across more than roughly 10% of a single elevation, or once the existing coating has simply reached the end of its working life.
Lifespan varies by material more than most people expect:
- Timber siding typically needs repainting every 5 to 7 years, faster in coastal or high-UV zones
- Stucco, fibre cement, metal, and plastic siding tend to hold a coating for 7 to 10 years under normal conditions
- Heavy sun exposure, salt-laden coastal air, or persistent damp shorten every one of those ranges, sometimes by several years
- A wall in constant shade with poor airflow will mildew and fail faster than an identical wall that dries out quickly after rain
Budget and timing go hand in hand. Repainting works best in mild, dry, stable weather, since paint applied in extreme heat skins over before it bonds properly, and paint applied in cold or high humidity can take days longer to cure fully. Manufacturer data sheets specify a temperature and humidity window for both application and cure. Ignore that window and you risk adhesion problems that show up as premature peeling within a year or two, not the five-plus years you paid for.
What proper surface prep looks like before repainting
Surface preparation is where paint jobs succeed or fail long before the first coat goes on. Industry guidance puts the bulk of premature failures down to inadequate prep rather than inferior paint, which is exactly why skipping steps here is the costliest shortcut in exterior maintenance.
The correct order, every time:
- Clean the entire surface with a soft wash to remove dirt, chalk, and mildew residue
- Dry fully, allowing at least 24 to 48 hours depending on humidity and airflow
- Remove loose paint with a scraper and sander, working back to firmly bonded material
- Repair or replace substrate where wood has rotted or panels have failed
- Sand and feather all repaired and existing edges so the new coat sits flush
- Prime all bare substrate, choosing a primer matched to the material underneath
- Caulk gaps, joints, and trim lines with a paintable, flexible sealant rated for exterior movement
- Apply topcoat in the number of coats the manufacturer’s data sheet specifies
Primer choice matters more than most DIYers assume. Bare wood generally needs an oil-based or acrylic wood primer to block tannin bleed, galvanized metal needs a primer formulated for that surface, and masonry with efflorescence needs an alkali-resistant primer or it will fail within a season. Use a polyurethane or high-quality acrylic caulk for exterior joints. Cheap latex caulk shrinks and cracks within a year or two, reopening the exact gap you just sealed.
Pro Tip: Skipping the priming step on bare or repaired substrate doesn’t just risk early failure, it often voids the paint manufacturer’s warranty outright. Read the data sheet before you skip a step to save time.
What paint actually holds up outdoors
Match the coating to the surface, not to whatever’s on special at the hardware store. 100% acrylic latex is the standard choice for wood siding and trim, since it flexes with seasonal wood movement and resists UV fade better than older alkyd formulations. Elastomeric coatings are built for masonry and stucco with hairline cracking, because their thick, rubbery film bridges small gaps that a standard acrylic can’t. Alkyd (oil-based) paints still have a place on high-friction trim like doors and handrails, where their hard finish resists scuffing, though many painters are shifting to hybrid acrylic-alkyd formulas for easier cleanup and lower odor.
Pigment and sheen matter more than most buyers realize. Darker colors absorb more heat and fade faster under UV exposure, while flat finishes hide surface imperfections but hold dirt more stubbornly than satin or low-sheen options. If your wall sits in direct afternoon sun, a lighter shade with a satin finish will simply outlast a deep, flat-finish color in the same spot.
The lifespan data backs up spending more upfront: quality acrylic systems applied correctly commonly reach the 7 to 10 year range on suitable substrates, while a bargain paint applied over inadequate prep can start failing within two or three years. Spread that cost over a full maintenance cycle and the premium product is usually the cheaper option, not the more expensive one.
A seasonal calendar for exterior paint care
Spread maintenance across the year and it stops feeling like a chore and starts feeling like five short tasks.
- Spring: do your detailed annual inspection and wash, since winter rain and wind usually reveal the year’s new damage
- Midyear: handle small touch-ups on anything flagged during the spring inspection, before minor issues widen
- Pre-wet season: clear gutters, check flashing, and confirm downpipes discharge well away from the foundation
- Late year: review your maintenance log and plan any full repaint for the coming mild-weather window
Gutter maintenance and vegetation trimming do more for paint longevity than most people expect. Overflowing gutters send water sheeting down exterior walls, and branches pressed against siding trap moisture against the film around the clock. Both problems are cheap to fix and expensive to ignore.
Timing your repaint matters just as much as the prep work. Avoid painting in peak heat, in cold snaps, or right before rain, since manufacturer cure guidance assumes a stable temperature and humidity window that extremes simply don’t allow. If you’re also tackling other seasonal jobs, a spring maintenance checklist can help you sequence gutter, roof, and paint tasks so nothing gets missed.
When should you call in a professional painter?
Some situations are beyond a weekend DIY fix. Widespread failure across multiple elevations, active damp, roof or gutter problems feeding water into your walls, difficult access above a second story, or a repaint you want backed by a real warranty all point toward hiring a contractor.
When you’re vetting one, ask pointed questions:
- How do you diagnose the cause of a failure before quoting the fix?
- What does your prep process actually include, step by step?
- Which primer and topcoat brands do you use, and why those?
- What warranty backs the work, and what voids it?
- Do you use an in-house crew, or subcontracted labor?
That last question matters more than it seems. A contractor using a rotating cast of subcontractors has a harder time guaranteeing consistent prep quality from one job to the next. Cape Apex Painters runs full-time, in-house teams across Cape Town, the Cape Winelands, and the Overberg specifically to avoid that inconsistency, pairing diagnostic surface assessments with damp-proofing expertise before a single coat goes on.
Where this maintenance advice comes from
The routines in this guide draw on published maintenance standards and regional climate guidance rather than general opinion.
- PCA Industry Standard P8 for scheduled maintenance program principles
- Maintenance Matters exterior coating guide for inspection intervals and material lifespans
- Surface preparation and application guide for prep sequencing and curing conditions
The uncomfortable truth about paint maintenance
Most exterior paint advice fixates on the topcoat, the brand, the color, the finish, as if the tin itself determines how long a wall stays looking good. It doesn’t. Preparation and consistency do the heavy lifting, and the industry standard bears that out: routine inspection and correction, not premium paint alone, is what preserves coating integrity over time.
Here’s where conventional advice falls short: it treats maintenance as an event, something you do once every several years when the house finally looks tired. That’s backwards. The homeowners who get the longest life from a paint job are the ones running a boring, repetitive six-month cycle: look, note, clean, fix small things fast. Nothing dramatic. Just consistency.
If you take one thing from all of this, prioritize the inspection log over the paint selection. A cheap acrylic caught early and touched up promptly will always outlast a premium coating left to fail quietly behind a gutter nobody checked. Substrate problems don’t announce themselves. They wait.
Get a diagnostic-first repaint instead of guessing
If your walls are showing chalking, peeling, or damp staining and you’re not sure whether it’s a touch-up or a full repaint, Cape Apex Painters solves that uncertainty with an in-person diagnostic assessment before any quote gets written. That’s the real gap between DIY maintenance and professional work: knowing whether you’re looking at a cosmetic fix or a moisture problem that will keep coming back.

Cape Apex Painters serves homeowners, estate managers, and commercial property owners across Cape Town, the Cape Winelands, and the Overberg, using full-time in-house teams rather than rotating subcontractors, so the crew that assesses your walls is the crew that fixes them. Their approach leans hard on preparation, damp remediation, and correct primer and coating selection for the Cape’s UV exposure and coastal salt air, which is exactly the prep-first process this guide has walked through. If your inspection has flagged failures spreading across a wall, or you’re due for the kind of full repaint discussed above, request a property assessment and quote and get a clear scope before any work starts.
Sources
- PCA Industry Standard P8
- Maintenance Matters – Exterior Paint and Coating Maintenance Guide
- Preserving Your Paint Job Maintenance Tips for South African Climates